Before we start there are a few "one time" steps that should be done.

From the Tool Pallet, open the "color sampler" tool. At the top you'll see "Sample size". For high res images, set it to 5x5. For low res, 3x3.
- Open a "curves adjustment" layer. There are 3 eye droppers on the left hand side. Double click on the top eye dropper. Set the RGB numbers to 7,7,7 and click OK. Next click on the middle eye dropper and set the RGB numbers to 128, 128, 128 and click OK. Last, click on the bottom eye dropper and set the RGB numbers to 247, 247, 247 and click OK.
 This is the only time you will will have to set these numbers.


Move the little white triangle all the way to the left, the "Threshold level" is 1. Slowly move it back to the right until a meaningful shape appears


In the tool bar, I choose the "color sampler" tool. Hold down the shift key and click inside the meaningful black area. This places a circle with the number 1 at that spot. This is my Black point
Now I move the same white triangle all the way to the right. The "Threshold level" is 255. Change the "Threshold level" to 254 and look to see if any new white pixels appear. If yes, I hold down the shift key and click on that pixel. A number 2 appears. This is my White point. If no pixels appear at 254, I move to a lower number until one does appear. (Note: There are times that I have to zoom in on the picture to see the areas while looking for this white pixel) I'm looking for the first white pixel below 255. If I use the white pixels showing when the "Threshold level" is 255, no correction will occur in the next step.
In Versace's new book, "Welcome to Oz 2.0", he adds the following step to find the mid-point. Actually, he learned this from Dave Cross, one of the Photoshop Guys. It works great.
Creat a new Layer > Edit Fill, select 50% Gray from the Contents dropdown menu > click OK.
Change the blend mode to Difference
Select the Threshold adjustment layer and move the slider all the way to the left
Move the slider to the left until you see the first or second black pixel
Zoom in and place a sample point on the pixel
Discard the Threshold and 50% gray layers
Your image should now have 3 sample points
I have located my Black point (1) and my white point (2) and mid-point (3)
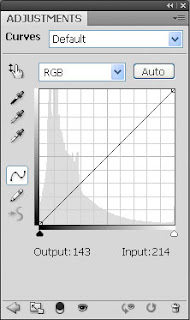
Next, I open a Curves adjustment layer again
On the left hand side I again locate the 3 eye droppers. Click on the top eye dropper. This will set my black point. I move the cursor over the point #1 and click. I see a change on the graph in the Curves dialogue box.
Click on the bottom eyedropper back in the Curves dialog box. Move the cursor over the second point I set (2) and click. This will set our white point.
Do the same with the middle eyedropper to set your mid-point
Vincent even goes so far as to use 3 individual Curve layers so he can go back in and make some additional correction if needed. I understand that for the type of work he does, but for my work I don't find that necessary.
The image is now color corrected.
This process takes a few more steps, however I find it to be very accurate.
No comments:
Post a Comment