Wednesday, January 27, 2010

Scott Kelby's blog talks about Reality


Scott Kelby, of NAPP fame, has a wonderful blog. Every Wed. Scott recruits a guest blogger. Today's guest is Peter Eastway who writes about, "What is photographic reality". It's a must read for those of us processing HDR images. The articles talks to the processing of images in camera and in the digital darkroom. Not so much for us, the photographer, but for those who look at our pictures and make the comments about reality.

Tuesday, January 26, 2010

David duChemin has a new ebook


David duChemin has just released his latest ebook . "The Inspired Eye II" picks up where the first one ended. It's a further exploration of the creative process.
I have down-loaded the ebook but have not read it yet. He's an excellent writer and I'm sure it's as good, if not better then, the others in his wonderful series. It's a great value at $5.00.
David just returned from Kenya. He's donating the proceeds from the sale of the first 1000 ebooks to a school so they can build a new wing and classrooms. What a great way to help kids and at the same time increase our own knowledge.
Thanks David.

Sunday, January 24, 2010

A Basic HDR Tutorial - Part 3

In this part of my tutorial series I'm going to tell you some things I've learned through trial and error.

Here are a few keyboard shortcuts that will help speed up the experimental process.

Windows:
  • Ctrl + Z (undo/redo)
  • Ctrl + Alt + Z (step back)
  • Shift + Ctrl + Alt + E (stamp visible)
Apple:
  • Cmd + Z (undo/redo)
  • Cmd + Alt (step back)
  • Cmd + Opt + Shift + E (stamp visible)

Remember that there are no rules when it come to processing HDR pictures. After the image comes out of Photomatix I strongly suggest that you take the time to analyze it. I can't stress this enough. Use the "image mapping" process I described in Part 2 if necessary. It will slow you down and give you time to develop a Processing Strategy. The picture may be dull and lack contrast. The colors may be muted. There may be areas that are blurred, etc.

This is what I do after Photomatix:

  • Develop a strategy
  • Work from Global Corrections to Local Corrections
  • I follow my normal work flow but I remain flexible. Every picture is different
  • Color correct. There are many ways to do this. Pick you favorite
  • Proceed to the process explained in Part 2 of this tutorial series if I need to combine areas from different images, i.e. replace or repair the sky with the original, fix moving objects

At this point I stop and again analyze the image. Now I start looking for the areas that need Local Corrections, i.e. contrast, sharpening, saturation, special lighting, etc. There are many tools in Photoshop to do these adjustments. All of these I do on separate layers utilizing a black layer mask. Then I use a soft white brush set to about 20% and paint in the look I'm after. By using a 20% brush I can slowly bring out the effect. (Think of yourself as an artist painting on a canvas).I can always back up if I've gone too far, (Ctrl or Cmd + Z).

I then try my favorite plug-ins. This is pure experimentation. I keep my eyes focused on just the area(s) I want to enhance. Remember, the Black mask I'll add will hide the entire effect. I'll just paint in what I want with a soft white brush. Am I repeating myself? That's how important the mask is. The plug-ins I use make adjustments faster and easier.

  • Topaz Adjust - I try different filters
  • Color Efex Pro 3 - There are great filters in this package. The magic grail is Tonal Contrast. Used locally it's wonderful
  • Viveza2 - The "U" point technology saves time
  • Imagenomic - Great noise reducing software

(Here's a hint. If you have a child or know a child in school, grammar school, high school or collage, check out Academic Super Store for these and other programs. You'll be shocked at the savings.)

One of my all time favorite filters in Photoshop is "Lighting Effects", (filter > render > lighting effects). This is how I do it.
  • I duplicate the layer or use the "stamp visual" keyboard short cut
  • I change this layer into a smart object (Layer > Smart Object > Covert to Smart Object) This will allow me to go back into the filter dialog box and make changes
  • I set the style to "Soft Omni" and play with the other sliders. You'll thank me for this one

  • Noise reduction. I like to do this near the end of my processing
Work the image. Look for little details. The process is the same. The more times you do it the easier and faster it becomes. Experiment and practice.

I invite you to visit the following sites. Not to copy what you see, but to see what can be accomplished.
  1. Stuck-In-Customs - Trey is the "Jedi Master" of HDR
  2. HDR Spotting

Suggested reading:

  1. A world in HDR - Trey Ratcliff
  2. Complete Guide to High Dynamic Range Digital Photography - Ferrell McCollough


I leave you with some final thoughts.

  • Good HDR pictures start with a good image at the point of capture. There is no substitute for this.
  • Take time to analyze the image that comes out of Photomatix and develop a strategy
  • There is no right or wrong. Experiment and develop your own style.
  • Above all else "HAVE FUN".

I'm available to answer questions at akesselhaut@hotmail.com.


(from time to time I'll update this HDR tutorial. I'll post the update on this blog)


Friday, January 22, 2010

Lightroom 3 Beta

There has been a Lightroom 3 Beta available for a while now. I personally don't download beta programs, on the advice of my good friend Steve Dreyer. However I like to learn as much as I can about them so when they do get released I'm up to speed.

Matt Kloskowski on his blog, Lightroom Killer Tips, has a new video that you may want to take a look at. I really like his style of teaching.

Monday, January 18, 2010

Photographers - Help Haiti

They need are help. Here's the direct link for more information.

D-Town TV is finally back on the air

D-Town TV is a fresh approach to teaching camera tips and photographic techniques. Scott Kelby and Matt Kloskowski (2 of the Photoshop Guys) are the hosts.

I didn't watch D-Town last year. I remember that it was primarily for Nikon shooters. It's back on the air, but now it will cover Canon, Nikon and Pentax, among others. I watched the first episode and just loved it. Matt and Scott do a great job.
Matt also has a wonderful HDR video tutorial explaining how to process images that have a blurred area to be repaired. I use this same technique when having to replace a sky.
Give it a try. D-Town TV

Friday, January 15, 2010

A Basic HDR Tutorial - Part 2

Now that you have your 3 images at +2 / 0 / -2 on the computer, you're ready to bring them into Photomatix for processing. I hope that you took the time to look at the Photomatix website for their tutorials. If not, click here and take a quick tour. They explain their product in great detail with some very fine illustrations. If you care to go further, they also have some good videos.

Photomatix shows how to load the images to be processed in step 2 of their tutorial. In the next step there are some choices.

With the "Generate HDR - Options" dialog box open, this is what I recommend.

Align source images - I have that box checked. It doesn't hurt to do that, even if you used a tripod.

I do not check "Reduce chromatic aberration, Reduce noise and Attempt to reduce ghosting artifacts." These corrections can be made in Photoshop later if there's a problem.

I click "Generate HDR" and Photomatix will merge the 3 pictures into a single HDR image.

Don't get scared when you look at the screen when Photomatix is finished. What you are seeing is a 32bit/channel image that your screen can't handle. The next step is where the fun starts.

Tone Mapping converts the 32bit/channel into a 16bit/channel TIFF or JPEG image that the screen can handle. At the bottom of the dialog box, I click "Tone Mapping". That brings up a dialog box with a lot of sliders. I'm only going to use a few of these to start. Once you get the hang of all the previous steps and process multiple images, you may want to experiment with the others. I don't bother with them at all. I'll show you my settings below, but first, a major point. Every image will be different. These setting will work fine as a starting point, but over time you will find the ones you like. Personally, I don't like the over-the-top HDR images. My settings will reflect that bias, however I invite you to experiment and find what works best for you.
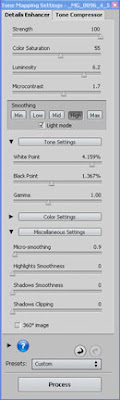
This is the dialog box you will see. Start at the top and work your way down. We'll be using the "Details Enhancer" process, so make sure that's on. Please pay attention to the histogram and the preview image. The preview image will give a general idea of what the final processed picture will look like, but remember this is only an approximation. The histogram is important. Try to get as much information as possible centered in the box, with little or no highlight or shadow clipping.

Strength: I leave this at 100.

Color Saturation: I like to do my color enhancing in Photoshop where there is more control, so I stay in the 50%-60% range. Move the slider back and forth to see what looks best.

Luminosity: This controls the brightness of the image. Moving the slider to the left makes it darker and to the right to makes it lighter. This can be modified in Photoshop later, so don't worry about it at this point and experiment to find the settings that suit you.

Microcontrast: This slider increases or decreases detail. I keep my slider between 1 and 2. Move the slider back and forth until it looks good to you.

Smoothing: This determines the overall look of the image. The higher the setting the more natural the look. The lower the setting the more unnatural. I keep mine set to High.

White Point and Black Point: I move the sliders back and forth until most of the histogram information is centered.

Gamma: I leave at 1.00.

I don't do anything with the other sliders.

Click Process

Here's an important trick. If you don't like the way the processed image looks and you want to start over and change your settings, just press and hold Control+Z to step back to an earlier screen in Photomatix.

I have talked to other photographers who have tried Photomatix HDR processing and didn't like the results for one reason or another.

THIS IS THE KEY CONCEPT FOR HDR: Processing with Photomatix is only the beginning of the HDR process. The image that comes out of Photomatix usually looks flat and may have other issues. It must be brought into Photoshop for further processing. You can use your normal work flow and/or introduce corrections from plug-ins. You can process it again in Photomatix. There are no hard and fast rules for HDR Processing. Experiment, experiment, experiment. You can always use the "Control + Z" keyboard shortcut to move back one step or the "Control + ALT + Z to move back multiple steps, or just start over.

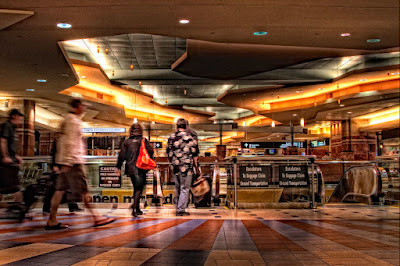
The first thing I do is take a few minutes to study the image. I learned this trick from Vincent Versace. Maybe it's not a trick but it certainly helps in my work flow. He calls it "Image Mapping". Image Mapping is a process by which he creates a new layer, clicks on the pencil tool, increase the Master Diameter to a good working size and draws out his strategy by making notes on the image. In the beginning it helped me to analyze my images and plan my correction strategy. (See the image below.) Give it a try.

Now that I'm in Photoshop with my 3 original pictures and my Photomatix processed image, I want to combine them and use the best parts of each. I may need all three of the originals or just one. Most of the time, I use the darkest and the middle exposed pictures. In the following example, I'm only going to use the image where the people are not blurred but the same steps will hold true if you use 2 or 3 images. I always make the big corrections (global corrections) first and then work towards the details, (local corrections). In the example above, I have indicated that I want to replace the blurred figures with those that are in not blurred. Here's how it's done:

I open the Photomatix processed image

Next, I open the original pictures where the people are not blurred and process it in Photoshop to have the same visual qualities as the Photomatix image. It won't be exact but it should be close. I click on the "Move Tool" ("V"), hold down the "shift key", click, drag and drop it over to the Photomatix image. I will now have the 2 images in perfect registration and both layers will be shown in you Layers Palette. I like to name my layers so I'm not confused later. To do this, I put the cursor on the layer name and double click. Type in something like "reduce ghosting".

At this point, we should discuss "Layers" and "Layer Masks". Layers and Layer Masks are the backbone of the final processing of our images. Here and here are additional tutorials for you to see. I strongly suggest you take the time to learn and understand them both.Next I add a "Layer Mask" to the top layer. (click the "add layer mask" icon at the bottom of the layers pallet [the gray square with the white circle]).

Here's another tip from Vincent Versace. He calls it the 80/20 Rule. If you're going to use 80% (+/- ) of the top picture, you'll use a White Mask, revealing the entire top image or, if you're going to use 80% of the bottom picture, you'll use a Black Mask which will hide the top layer completely and reveal the bottom layer. I hope that makes sense but once you try it you will find it easier to understand.

Here's the 20% (+/-) part. If I have applied a white mask I do the following:

I make sure that the Foreground and Background colors are at their default setting by pressing the "D" key. I have the Foreground color set to Black. I can switch the Foreground and Background colors by pressing the "X" key.

I click on the Brush Tool ("B") and check to see that the Opacity is set to 100%. I use a soft brush in a size required to accomplish the task at hand and change the size by using the right and left bracket keys as needed.

I make sure that the Layer Mask is active in the Layer Panel by clicking on it. I paint over the areas of the Lower Layer that I want to reveal. I don't worry if I make a mistake. If I do, I can switch the foreground color to White by pressing the "X" key again and paint over the area I want to fix with a White brush.

If I applied a Black Mask revealing the entire bottom layer, I would set my Foreground color to White and paint with a White brush and make corrections with a black brush.

When I have completed the work with these layers, I "Merge Down" by pressing and holding the Control Key + E. If I then want to introduce parts of another Original Picture, I do the same steps over again, using another image.

At this point I use my noiseware filter. I have found that Imaginomics Noiseware Pro works great using just the default settings. If I want to introduce some noise, I use the Opacity slider.

I given you a lot of information. Practice the above steps. Don't be afraid to experiment and make mistakes. In Part 3, I'll discuss some addition tricks and suggestions to help complete the process.If you have any questions, please email me at akesselhaut@hotmail.com

Thursday, January 14, 2010

NIK Software Daily Webinars


NIK Software plug-ins for photoshop are fantastic. I use Viveza 2 and Color Efex Pro 3.0 on most, if not all my images. They now have daily webinars that will introduce you to their basic usage. Here's the information.

Wednesday, January 13, 2010

When is your editing process finished?

I have been using Photoshop about 4 years now. I process a picture and save it. I close the file and sometime later open it again. This could be minutes, hours or days. It doesn't matter. When I do open it again it's with a fresh eye. It helps me evaluate the corrections I have made.
But there's another side to the argument that I think you should read. You can find it here.

Thursday, January 7, 2010

PhotoshopUser TV is back on track

PhotoshopUser TV was off the air for a few months while they re-did their set. When it came back on late last year, with a new format, it really needed some refinements. The Photoshop guys realized the problem and now have nailed it. The new set is great and they're back on track with tutorials, tips, interview's and a contest. Even the jokes are back. Matt, Scott and Dave do a great job. I highly recommend giving it a try, here.

Wednesday, January 6, 2010

I'm working on Part 2

I'm almost finished with Part 2 of my Basic HDR tutorial. I should have it ready to post in the next few days. Look for it. There will be a Part 3. Part 3 will have some tips and tricks I use over and above my normal HDR processing.

I will repeat the following over and over, I want you to know that I experiment all the time. Sometimes successfully and most of the time not. But it's fun and I continue to learn. I suggest now and will continually invite you to do the same. There is no right or wrong with HDR. It's all about your vision.

Friday, January 1, 2010

A Basic HDR Tutorial - Part 1

My goal with this post is to help you understand how to shoot and process HDR images and explain why I find the HDR process to be an exciting tool in the field and in the digital darkroom. I could rehash the HDR wars: those who hate HDR, those who love HDR and all those in between. Instead, I'm going to cover the major points and let you make your own decision. There's plenty of detailed information (in the blogosphere???) if you're intrigued enough to pursue hdr further.This tutorial will not be one that will teach you " The 9 steps to perfect HDR pictures every time". This tutorial will start you in a direction and give you a chance to experiment with the programs and settings I recommend. Only then will you find your own way and your own style. Don't be afraid to make mistakes. You can always step back or start over again with the knowledge you have gained from these mistakes.

At the end of Part 2 of the tutorial, I'll give a list of sites to explore. I encourage you to visit them and study the images you see there. Don't try to replicate them but try to understand what went into the capture and the digital darkroom processing.

Why use hdr?:
As simple as I can make it, we see in HDR. Take a minute to think about that. Our eye sees into the shadows and sees the highlights simultaneously. Our camera sensors can't do both at the same time. Hdr therefore is able to create an image that more closely reflects what our eyes see than standard digital photography. Some photographers argue that HDR is not true photography. I say, we don't see in black and white but black and white photography is not only accepted but is among the best-regarded of photographic methods.

The tools we need when we click:

  • A good dslr that has Automatic Exposure Bracketing (AEB). This will allow you to take multiple exposures without resetting your camera. More about this later.
  • A solid tripod
  • A cable release

How to set up your camera:

  • Turn off Auto Focus
  • Turn off Image Stabilizer
  • Set your AEB to +2 / 0 / -2 . For most HDR pictures this will give you all the exposures you'll need. I know there are some cameras that will shoot more when set up; that's okay too.
  • Set your ISO to 100. No set rule but we want to control the noise at capture, if we can. There's plenty of room for experimentation here.
  • Set your camera to Aperture-Priority mode (AE).
  • Set your camera to shoot RAW images.
  • Set your Drive Mode to High Speed Continuous if your camera has that option.
  • Turn on your Highlight Alert, known to some of us as Blinky's.

I'm a Canon shooter. My camera has "Register Camera User Settings" modes C1 and C2. Check your owner's manual. I've set these up so I can dial in most of the above setting automatically by just turning the mode dial.

Here's the "KEY CONCEPT". There is no substitute for taking a good picture. HDR will or will not make your print look better, but HDR will definitely not make a badly conceived and shot photograph better. It's just a tool to make your image look more like the way you saw it at the moment of capture.

The software I use:

Adobe Photoshop. This should go without saying.

Photomatix Pro. This program is the preferred choice of most people I know who process HDR images. It's reasonably priced and simple to use. You can find some really great tutorials on their site and on the web. I'll discuss the settings I use later.

Imagenomic Noiseware Professional. This is a very good noise reducing software package. The default settings usually do the corrections needed.

Topaz Adjust. This is not required but check out their site to see what it can do. Even though a single image can be processed in Photomatix, I also use Topaz Adjust to accomplish a similar effect, only faster.

Color Efex Pro 3. Again this is not required but it's a great help for local corrections and/or enhancements.

So now that you have the basics, go out and shoot some frames, keeping in mind that you're going to process them in Photomatix and create HDR images. Look for subjects that have hard shadows and bright highlights. Photos taken at mid-day with the sun shining are a good start, although it's the kind of shooting you would never choose to do otherwise. Try to focus in on and remember what you're seeing, not through the view-finder, but with your eyes. Try to view the world in a different way. It's challenging, but with practice you'll be able to do it. Trust your histogram. After the 3 click, check all 3 histograms, making sure that there are no Blinky's. If there are, make the required adjustments.

In Part2 of this tutorial, we'll take your uploaded pictures into Photomatix and process them. That's where the magic happens.


If you have a question with Part 1, send an email to akesselhaut@hotmail.com.